The DU Lounge
Related: Culture Forums, Support ForumsAny geometry geniuses here?
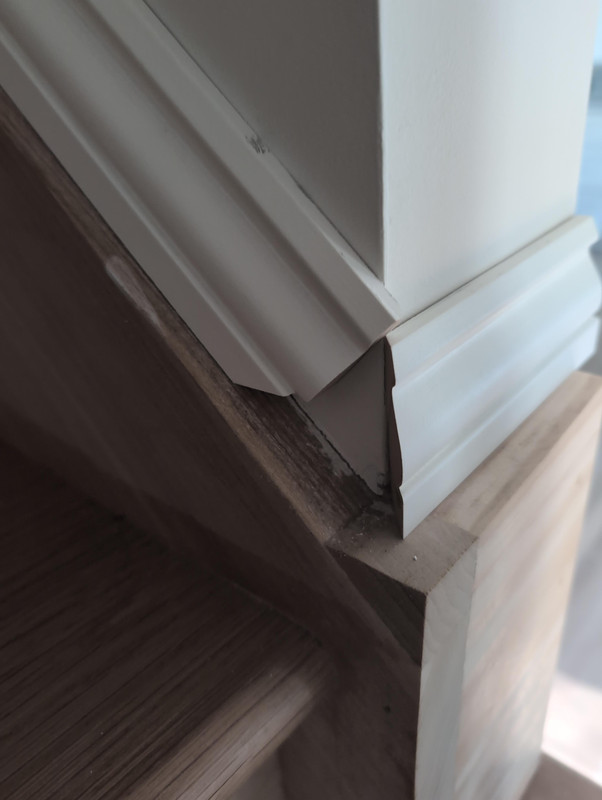
I'm going to post a picture from Reddit, as well as a link to the thread.
The title of the thread is 'How to trim around this corner"?
I have a similar situation in which I need to form an outside corner joint where a level plane meets a sloped plane with a profiled baseboard.
In my case, it's where my dining room floor slopes down slightly to my kitchen floor. I did a quick solution years ago, but it doesn't look good. I stare at the thing every day, and I can't figure out the miter cuts.
Based on the comments in the thread, it seems like other people have this problem too. I don't really see an understandable solution in the comments, but some of them are hilarious....like "just caulk it".
I can *almost* visualize the cuts if the trim was flat with no profile, but it becomes tricky on profiled miters.
This post is kind of like a hail Mary pass for me, because all of the good old-time carpenters that I used to know have passed on, so I can't ask them. And the problem is...this is one of those things where it is very difficult to find a video or diagram that someone like me can understand.
Picture, followed by link so you can see the comments. The question is...how do you join those two pieces of trim at the corner?
https://old.reddit.com/r/Carpentry/comments/1sxj8it/how_to_trim_around_this_corner/
 = new reply since forum marked as read
Highlight:
NoneDon't highlight anything
5 newestHighlight 5 most recent replies
= new reply since forum marked as read
Highlight:
NoneDon't highlight anything
5 newestHighlight 5 most recent replies

multigraincracker
(37,956 posts)
LuckyCharms
(23,012 posts)I was going to put an outside corner block, and then just run each piece into the block with one angle cut on each piece. But, there has to be a way to cut both a miter and a bevel on each piece that enables the pieces to meet.
I just can't visualize it.

pfitz59
(12,878 posts)Measure all the legs. Copy to a piece of cardboard. Cut the cardboard. Check to make sure it fits. Use the cardboard cutout as a stencil for the filler piece. Use a jig saw and cut the filler piece. Use a router to cut a 45 degree angle on the inside of the right leg to make it fit flush. Glue into place.
LuckyCharms
(23,012 posts)
Harker
(18,062 posts)And I'm fine with it.
Slap a little putty on it.
LuckyCharms
(23,012 posts)put a piece of duct tape over the gap. 
One of the comments says...just pee on it.
Harker
(18,062 posts)Was the poster a beagle?
LuckyCharms
(23,012 posts) Harker
(18,062 posts) 
Kali
(56,877 posts)How would you fit that angle to a horizontal normally? I have to break things down to smaller problems. To me it doesn't seem like it works at anything other than a 90 degree angle but I watched one of your videos of a window job that was amazing.
LuckyCharms
(23,012 posts)meaning...if it was something close to a 90 degree corner, you would just cut a 45 degree bevel on each piece, and join them together.
Or, if the angle was not exactly 90 degrees, you would measure the angle, divide it by 2, and cut the bevel to something different than 45 degrees.
ie: you might cut each bevel at 44.5 degrees.
My problem here is that the solution can be explained to me as in a comment above, but I need a clear picture or drawing that shows it to me before I can understand it. 
Kali
(56,877 posts) LuckyCharms
(23,012 posts)Then, the piece on the right would just be a 90 degree cut butted into the corner block.
The sloped piece on the left would butt into the corner block by cutting a simple angle on the left piece.
But that looks real busy to me, and I don't like the look.

Ptah
(34,146 posts)
The only tool I own is a screwdriver! 
Harker
(18,062 posts)LuckyCharms
(23,012 posts)It's a compliment.
I think.
Harker
(18,062 posts)
sorcrow
(681 posts)Light on the orange juice, I suppose.
Regards,
Sorghum Crow
Whip-poor-will
(451 posts)45 degree face cut 42 degrees stair rake angle.
At this piont three coats of bondo with the last coat fiinishing off with a light sanding. PRIME FIRST before a final coat
Use a 4/6" putty knife to flow the profiles together.
LuckyCharms
(23,012 posts)I've got factory pre-finished oak that I'm working with.
Can't use caulk or Bondo. Can't sand to flow the profiles together.
Whip-poor-will
(451 posts)Ask around for someone with a compound miter set blade at 45 Degrees angle should be 42 degrees. These saws are common among woodworkers or trimmers.
I always start with a scrap wood to guess an angle 1X3 or 1X4 pine just to check look.

applegrove
(132,949 posts)all the proofs.

Alpeduez21
(2,065 posts)Except in the sense that Wile E Coyote was a super genius.
I would first line the stair board up with vertical corner line. Cut straight down (across) the stair side trim board so that board now has an acute angle at the bottom of the stair and the vertical corner. Mate that with the horizontal trim. Probably use a coping saw for the cut. The stair side trim board will need a portion of the bottom angle cut flush to the flat section. I would concentrate on the stair side before the horizontal trim piece. Horizontal just seems easier to match up. The acute angle can be measured using on of those angle things that lock into place. Draw a line on the stair trim and cut it with a 45 degree bevel. (Edit) make the bevel if you are not using a coping saw That’s what I would do

Niagara
(12,028 posts)

LuckyCharms
(23,012 posts)Measure twice, cut once, and if you cut it too short, cut it again, and keep cutting until it is long enough.
If it is still too short, pee on it.
While praying.

FullySupportDems
(477 posts)But I'd be pretty dangerous with Patch & Level. I hate cutting molding, and that looks tricky.
White duct tape, definitely.
And BEAGLES! And Chihuahuas!
Brother Buzz
(40,307 posts)I learned Japanese geometry from a Zen Buddhist cabinet maker, but my proofs mostly work on transferring pyramid angles to a table saw.
Maninacan
(332 posts)I would put a square post in the corner.

Pobeka
(5,008 posts)Because the piece coming down the stair has a longer "intersection" across its face. So no matter how you do it, the stair side moulding will not match the horizontal piece.
You could do it if the moulding cross section was a perfect rectangle...
LuckyCharms
(23,012 posts)Pobeka
(5,008 posts)Lots and lots of sines, cosines and integrals, and drawing pictures.
Glad to help you figure it out.
LuckyCharms
(23,012 posts)asking about his upcoming finals.
He's doing really well with grades, but he is worried about his upcoming Calc II exam.
The only calculus course I ever took was Business Calc at university.
I loved that course, and aced it. Teacher was a grad student from France who drank wine out of a bota bag while we took our exams. One of the best instructors I've ever had.
The hardest math related course for me was statistics. Before that course, I never realized how difficult that stuff can be to conceptualize.
Niagara
(12,028 posts)
LuckyCharms
(23,012 posts)Last edited Thu Apr 30, 2026, 12:23 PM - Edit history (1)
JFC!!!
Post number 30 is correct, and that is the entire problem.
To get it to fit correctly, you would have to rip down the raked (slanted) piece on the left to reduce its width. But if you did that on a profiled piece of molding, it would not look right.
So you would need to add a triangular piece to make the corner transition.
I can sort of understand in theory how the triangular piece would be cut, but actually doing it as a practical matter on the saw...that's where I'm struggling.
This video just made me drool in stupidity. I don't really understand it, because I'm no rocket surgeon. Well, I understand the first part, but when he starts drawing the profile lines...holy shit...
Have a look if you want to challenge your brain...
Harker
(18,062 posts)and I got a rare (for me) B in high school geometry.